Dear Visitor ~ If you Find any Broken Download Link Kindly Inform Me with Comment! Thank

27 February 2013

How to Setup Custom Domain DNS Setting in Blogger

i hope you read carefully my previous post on Cheapest Web Hosting & Domain Registration in Pakistan. I saw many newbies bloggers from Pakistan have bought domain name for your blog from hosterpk.com. after knowing the benefits of custom domain newbies want to switch to own custom domain. But while configuring their new domain name on blogger in resulting many issues for them and therefore, then i decided to help all those who weren't able to configure their new domain name in blogger.

IMPORTANT NOTE: if you have any problem regarding this tutorial please comment me in comment section below. and if you like this tutorial and its help you little please kindly subscribe by Email
Enter your email address:


There are 2 major part for configure new domains

  1. Setting up Domain on blogger
  2. setting up DNS at Domain control panel.
Some Important Tips
1st Get Custom Domain name from hosterpk.com
NOTE 1: if you have already bought domain then skip this procces.
First of all you have need to purchase a domain name from hosterpk. After making payment of domain just confirm your payment using this link http://secure.hosterpk.com/depositconfirmation.php

NOTE 2: after paying payment, email at: support@hosterpk.com and ask for providing you  a domain control panel and they'll send you a link from which you login to your domain control panel. after receiving email with login details simply login to your domain control panel.

Now go come back to blogger.com and do the following step:

1st Setting up Domain on blogger
Goto Blogger Dashboard 
Setting > Basic > Publishing > Add a Custom Domain > Switch to advanced settings > and enter domain name you have already purchased and click save button.

Now when you enter domain address you already purchased in 1st box and click save button, the following error 12 has been genrated by blogger. which say We have not been able to verify your authority to this domain. Error 12. you have verify authority to this domain by adding two different Cname records for blogger and Google.

Also there is link in above picture which says "Setting Instructions" so just simply click it, now we'll be here on this page.

First of all we'll have need to add four different Google IPs to our A-records section and two different Cname records at Cname section in DNS. Now these all steps doing at Domain name control panel. But keep the setting instructions page visible on a separate tab on your browser, because you'll need to copy the Unique CNAME" and "A-records from here for setting up DNS.

2nd Setting up DNS at Domain control panel
Login to your domain Control panel in order to add a-records and Cnames and to your DNS.
After login to your domain control panel and just hover mouse over the "Manage Orders" so a drop down will open, just click the "List/Search Orders".

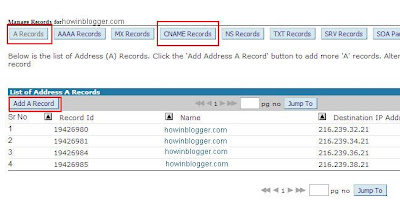
Now you will be redirected to new page where the list of your bought domains. here is list of domain names which I'v purchased from them, And you need to just click on one domain as I clicked on howinblogger.com and you'll be redirected to another page, just scroll down and click the Manage DNS link and you'll be redirected to this page.
now You'll have to insert the four different Google IPs into four separate a-records. As in above picture I've already added four Google IPs, you find this feild blank so just click the Add a Record and you'll be seeing this page and where its say "Destination IPv$ address" Enter 216.239.32.21 And after inserting them just click the Add Record button. You'll have to repeat this process 4 times, because there are 4 different Google IPs and each one will be added separately.
for 1st  A-record 216.239.32.21
for 2nd A-record 216.239.34.21
for 3rd A-record 216.239.36.21
for 4    A-record 216.239.38.21
That's all procces for adding A-records and after completing A-record adding procces you have need to add 2 diffrent cname records. first of all clicked "Add CNAME Record".
then goto setting instructions page which you have open at blogger.com 
This procedure is called "Propagation" and it takes 24 to 48 hours for completing, so wait and after that come back to your Blogger Dashboard and revise the 1st step.

18 February 2013

How to Unlock Nokia Mobile Security Code 100% Working


This post discus about methods that you can use to reset your Nokia phone’s security code.

Every Nokia phone comes with default Security code 12345. If you care about security of your phone or personal information like contacts, photos or anything important that you put on your handset, this code can be essential. You can use this code on your key guard.

So it’s important change default code & uses own code for security. But lots of people tend to forget this code because they don’t use it so often. and once forgotten 
Nokia care center charge about 200 rupees to reset your Nokia mobile security code.


Even you can reset code your mobile using your PC & following steps and you can save 200 rupees and time to visit Nokia Customer care.
 That’s where is post comes in to action. I’ll provide a methods to reset it below.

NOTE: If you enjoyed this post and wish to be informed whenever a new post is published, then make sure you Subscribe to our regular Email Updates!

How to Reset Security Code of Nokia Mobile Using Nemesis Service suite?

1) Download & install Nemesis Service suite from the following link.Download NSS
2) After installation Connect your Nokia Mobile Using DATA cable in OVI suite Mode.
3) Exit Nokia PC Suite if install.
4) Open NSS and Scan new Device.

5) After Scanning Select Tools Option Then Factory Setting>Full Factory and Reset. After Completing step Unplug your mobile and check that your mobile is reset to default code (12345).
NOTE : if you have any problem regarding this tutorials Please Comment me Below.

13 February 2013

How to Submit Blogger Sitemap to Bing and Yahoo

In one of my recent blog articles, I discussed about Submit Blogger Sitemap to Google Webmaster Tools. I hope you have done that today I will be writing on how to submit your blog sitemap to Bing and Yahoo webmaster tool without Error. it will help you to get your blog/Site pages indexed by Bing and Yahoo so that your blog will show up in Yahoo and Bing search results and you get more traffic from it.


How to Submit Blogger Sitemap to Bing and Yahoo?

Follow these simple steps:
1. Sign into Bing Webmaster Tools using your hotmail or live account ID.
2. After login you will see a dashboard. Click the button " Add Site".

3. You will be redirect to new page and you see 2 boxes.
   in 1st:  (Submit your URL)
   in 2nd: (submit Code Given Below) NOTE : Replace www.muhammadfarhad.net with your blog/site URL.
http://www.muhammadfarhad.net/atom.xml?redirect=false&start-index=1&max-results=500
4. Now it will be asked to verify ownership of the website or blog you submitted. You will be provided 3 methods. Choose the Option 2: Copy and paste a <meta> tag in your default webpage.

5. You can add a <meta> tag to the <head> section of your default webpage. Simply copy it and paste the code just below <head> inside your blogger template. To do this go to
  • Blogger Dashboard > Template > Edit HTML > Backup your template
  • Search for <head>
  • Just below it paste the code
  • Save your template. All done!
6. Now go back to BING webmaster tools page and click the "Verify" Button.
Congratulation your sitemap will be successfully Submitted
7. it should take at most 3 to 5 business days for BING and YAHOO to start showing data for your newly submitted site.

7 February 2013

How to Change Comment Section with Beautiful Style in Blogger

Blogger has amazing features except it's comment box. Google developers are working hard to improve its feature and results can be seen in Blogger New interface. To make your blog more successful we need frequent commenters, more than loyal readers. The only way to keep your old article alive is to reply to the Comments, but if you aren’t getting any comments then surly the post will die in quick succession. Today we will optimize our Blogger Comment Box, so users don’t hesitate while publishing a comment.You Can able to Change/Customize Comment Section as you wish. I have changed my comment box and writing a post on this trick. Changing of this is very easy and takes only 5 Min. Let's see how to add it to your blog.

How To Customize Blogger Comment Box

1.  Go to Blogger Dashboard > Design > Edit Html.
2.  Now Search Code Given Below.
]]></b:skin>
3.  After Searching paste code given below just above from this.
@font-face {
  font-family: 'Philosopher';
  font-style: normal;
  font-weight: 400;
  src: local('Philosopher'), url(http://themes.googleusercontent.com/static/fonts/philosopher/v4/OttjxgcoEsufOGSINYBGLYbN6UDyHWBl620a-IRfuBk.woff) format('woff');
}
.comment .avatar-image-container {
border: 1px solid #B6B6B6;
max-height: 70px !important;
margin-top: -5px;
width: 70px !important;
position: relative;
z-index: 50;
}
.comment .comment-block {
margin-left: 75px !important;
}
.comment .comment-header {
background: none repeat scroll 0 0 #A9F5D0;
color: #333;
font-size: 15px;
font-weight: bold;
margin-left: 60px;
}
.comment .comment-header a {
color: white !important;
text-decoration: none;
}
.comment .comment-content {
background: none repeat scroll 0 0 #FEFFF9;
border-bottom: 2px solid #E6E6E6;
font-size: 14px;
margin: 0 0 30px;
padding: 5px 5px 10px 10px;
}
.comment .comment-actions a {
background: none repeat scroll 0 0 #DDD;
color: #333;
display: inline-block;
line-height: 1;
margin: 0 3px;
padding: 3px 6px !important;
text-decoration: none;
}
.comment .comment-actions a {
background: none repeat scroll 0 0 #DDD;
color: #333;
display: inline-block;
line-height: 1;
margin: 0 3px;
padding: 3px 6px !important;
text-decoration: none;
}
.comment-header cite {
background: none repeat scroll 0 0 #DF7401;
border: 1px solid white;
color: white;
padding: 2px 20px;
position: relative;
z-index: 99;
margin-left: -20px;
}
cite.blog-author {
background: none repeat scroll 0 0 #8181F7 !important;
}
.icon.blog-author {
display: none !important;
background: url("") no-repeat scroll 0 0;
margin-left: 90px;
width: 60px !important;
height: 60px !important;
position: absolute;
right: 5px;
bottom: 5px;
top: 10px;
}
.comment .comment-header {
color: #333;
font-size: 15px;
font-weight: bold;
}

.comment .avatar-image-container img {
border: medium none !important;
height: 70px !important;
width: 70px !important;
max-height: 70px !important;
max-width: 70px !important;
}
.comment .comment-actions a {
background: none repeat scroll 0 0 #DDD !important;
color: #333 !important;
display: inline-block !important;
line-height: 1 !important;
margin: 0 3px !important;
padding: 3px 6px !important;
text-decoration: none !important;
font-size:16px;
}
.comment .comment-actions a:hover {
background: #CCC !important;
text-decoration: none !important;
}

.comments {
font-family: 'Philosopher', arial, serif !important;
font-size: 1em;
color: black;
}
.comments .continue a {
display: block !important;
font-weight: bold !important;
padding: .5em !important;
color:#E34600;
font-size:16px;
}
.comments .continue a:hover {color:#4D3123;text-decoration:none;}
.item-control {
display: none !important;
}
.comments .continue {
border-top: 2px solid transparent !important;
}
4.   Save Template and Visit your Blog/Site. ENJOY

ShareThis

Related Posts Plugin for WordPress, Blogger...