i hope you read carefully my previous post on Cheapest Web Hosting & Domain Registration in Pakistan. I saw many newbies bloggers from Pakistan have bought domain name for your blog from hosterpk.com. after knowing the benefits of custom domain newbies want to switch to own custom domain. But while configuring their new domain name on blogger in resulting many issues for them and therefore, then i decided to help all those who weren't able to configure their new domain name in blogger.
IMPORTANT NOTE: if you have any problem regarding this tutorial please comment me in comment section below. and if you like this tutorial and its help you little please kindly subscribe by Email
There are 2 major part for configure new domains
IMPORTANT NOTE: if you have any problem regarding this tutorial please comment me in comment section below. and if you like this tutorial and its help you little please kindly subscribe by Email
There are 2 major part for configure new domains
- Setting up Domain on blogger
- setting up DNS at Domain control panel.
Some Important Tips
1st Get Custom Domain name from hosterpk.com
NOTE 1: if you have already bought domain then skip this procces.
First of all you have need to purchase a domain name from hosterpk. After making payment of domain just confirm your payment using this link http://secure.hosterpk.com/depositconfirmation.php
NOTE 2: after paying payment, email at: support@hosterpk.com and ask for providing you a domain control panel and they'll send you a link from which you login to your domain control panel. after receiving email with login details simply login to your domain control panel.
Now go come back to blogger.com and do the following step:
1st Setting up Domain on blogger
Now when you enter domain address you already purchased in 1st box and click save button, the following error 12 has been genrated by blogger. which say We have not been able to verify your authority to this domain. Error 12. you have verify authority to this domain by adding two different Cname records for blogger and Google.
Also there is link in above picture which says "Setting Instructions" so just simply click it, now we'll be here on this page.
2nd Setting up DNS at Domain control panel
Login to your domain Control panel in order to add a-records and Cnames and to your DNS.
After login to your domain control panel and just hover mouse over the "Manage Orders" so a drop down will open, just click the "List/Search Orders".
Also there is link in above picture which says "Setting Instructions" so just simply click it, now we'll be here on this page.
First of all we'll have need to add four different Google IPs to our A-records section and two different Cname records at Cname section in DNS. Now these all steps doing at Domain name control panel. But keep the setting instructions page visible on a separate tab on your browser, because you'll need to copy the Unique CNAME" and "A-records from here for setting up DNS.
Login to your domain Control panel in order to add a-records and Cnames and to your DNS.
After login to your domain control panel and just hover mouse over the "Manage Orders" so a drop down will open, just click the "List/Search Orders".
Now you will be redirected to new page where the list of your bought domains. here is list of domain names which I'v purchased from them, And you need to just click on one domain as I clicked on howinblogger.com and you'll be redirected to another page, just scroll down and click the Manage DNS link and you'll be redirected to this page.
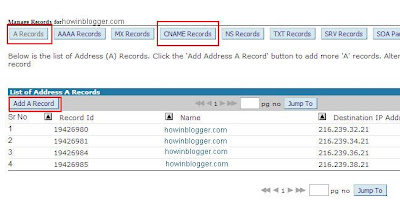
now You'll have to insert the four different Google IPs into four separate a-records. As in above picture I've already added four Google IPs, you find this feild blank so just click the Add a Record and you'll be seeing this page and where its say "Destination IPv$ address" Enter 216.239.32.21 And after inserting them just click the Add Record button. You'll have to repeat this process 4 times, because there are 4 different Google IPs and each one will be added separately.
for 1st A-record 216.239.32.21
for 2nd A-record 216.239.34.21
for 3rd A-record 216.239.36.21
for 4 A-record 216.239.38.21
That's all procces for adding A-records and after completing A-record adding procces you have need to add 2 diffrent cname records. first of all clicked "Add CNAME Record".
then goto setting instructions page which you have open at blogger.com
This procedure is called "Propagation" and it takes 24 to 48 hours for completing, so wait and after that come back to your Blogger Dashboard and revise the 1st step.


Good one and that can be continued.
ReplyDeleteVery good post post and excellent way to represent .
ReplyDelete